Thursday 21 May 2020

Vintage style decorated notebook

I made the notebook for the Gecko Galz Monthly Image Challenge May 2020. The Challenge is to create a craft project using this image and then post it on the Gecko Galz blog using the Linky by the 29th May 2020


To start I took apart a notebook and made my own cover out of Kraft card. For the background, I used a patterned paper that I cut to size and coloured around the edges with Distress ink, then I cut out two different layers of paper, staggering the size of each piece one is of patterned paper from the Sunday Times by the Gecko Galz and then I also used tea-dyed paper and hand-stamped a design on the top right and the bottom left corners to balance it.


The image has been resized to make it the focal point on the front of the notebook. I layered the patterned and the hand-stamped paper on top of each other and then added the image on top of that, before glueing these all down I added a selection of lace trims around the edges of the bottom layered pieced of paper.


For the decoration on the front of the notebook, I added a burlap trim on the top and the bottom. Finally, I added two fabric appliques that I have hand-dyed on the top left and the bottom right of the image and then added the paper flowers.

I want to take part in the Gecko Galz Monthly Image Challenge May 2020


Vintage style Nature themed pocket


The size of the pocket is 51/2 by 73/4 inches. I made this for the Nature prompt May 2020 on The Mixed Media Emporium with Nina Ribena and Kylie Coo on Facebook

The pretty bird image is from Vintagebyme on Etsy. The pocket is made out of a manilla file folder that I cut to size. On the fold of the pocket, I added Tyvek to strengthen it and then I glued down both sides to make a pocket.

For the background I made a spray using a mixture of Distress Oxide ink in Vintage photo and Distress ink in Vintage Photo and added these to a small amount of water in a spray bottle and mixed them together, then sprayed the mixture over the folder and heat set it. When dry I gave the pocket a light coat of white Gesso this not only gives the option of being hand stamped on when dry it also adds strength to the pocket, I used a script stamp and randomly stamped that over the pocket.

Using pretty paper I hand-stamped in one corner to match the printed design on the other corner so it looked balanced. I then layered with a brown piece of patterned paper and then the bird image distressing the edges with scissors on all of these to give a shabby look. I added more cheesecloth around the edge of the layers and then glued everything down to the front of the pocket.


The paper flowers that I used were blue and purple as I did not have anything to match the project. I painted the flowers with copper paint so that they will match the rest of the project.

I used burlap fabric, cheesecloth and funky fibre yarn all in similar colours and arranged them so that they would look nice on the bottom right and top left of the image. I added die cut leaves that I had distressed with ink and glued those to the bottom right and the top left of the image. Then when the flowers had dried I glued those down on top of these.

Finally, I added lace trim to the top of the pocket and on the bottom of the pocket

Sunday 10 May 2020

Vintage style bookmarks

I made these for a Nature Challenge with an optional twist of vintage on the Gecko Galz Papercrafting Challenge group on Facebook and I am also entering the Gecko Galz blog May Customer Challenge called Vintage Botanicals.


The background paper and the images are all from the Gecko Galz


To start I cut brown kraft card to the size I wanted. I papered each bookmark using different paper designs that I tore into random pieces and glued these onto each bookmark. Then I resized an array of different collage sheets in a program on my computer and then printed them out, I wanted the images to be small enough for me to cut each image out to make a collage on each bookmark.


 I made each bookmark in its own colour scheme. When I had fussy the images out I arranged them on each bookmark so that there was no focal point as when finished I wanted to make each one interesting to look at. Finally, I added lace to each bookmark and a lace tab at the top of each one


I want to take part in


Vintage Botanicals May 2020 Customer Challenge

Gecko Galz

Beautiful Blooms May 2020 Challenge


A Vintage Journey


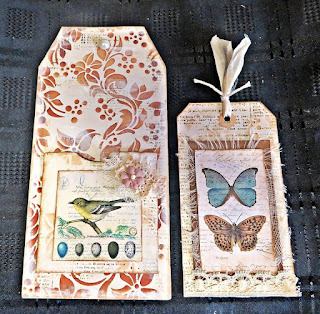
Shabby Chic style tag with a pocket and a small tag


I made this for the May 2020 Technique mask/stencil Challenge on the Gecko Galz Papercrafting Challenge Group on Facebook.


To start I made a large tag out of good quality thick white card and cut it to the size, then I papered the background. Then I stencilled over the background using a Distress Oxide ink pad in Vintage Photo. I lightly went around the edges of the tag and over parts of the design with white gesso to give it a shabby look. 


I made a pocket using the same background paper and lightly shaded through the stencil again with the Distress Oxide in Vintage Photo to give it the same design as I used on the large tag. I then added the image of the bird and decorated the pocket using cheesecloth, lace trim and a small paper flower. Finally, I added a large flat back pearl to the top of the tag.


For the smaller tag, I used the same background paper and lightly shaded through the same stencil over the tag with the same colour of  Distress Oxide. I cut a piece of kraft card to size and layered on top of that with cheesecloth and the butterfly image. I added lace to the bottom of the tag and to finish the whole look of the tag I added sari silk tied with string at the top

Images used are from Gecko Galz on Etsy, they are Sunday Times Mini Paper pack, Birds of a feather 2 and Butterfly Dreams 2

Saturday 9 May 2020

Vintage style altered file folder with pockets

I entered this into a Portrait Challenge in April 2020 on the Gecko Galz Papercrafting Challenge Group on Facebook. The image is from Gecko Galz Sweet Little Cuties on Etsy.

I watched a tutorial on youtube by Robin Dudley Howes on how to make an altered folder.

To start I used a file folder and made it to the size that I wanted. I use Tyvek to strengthen the folds on the folder. I made a pocket for the front and also added two strips of card cut and folded in half and then glued one on each side to give more room inside the pocket


I sprayed the file folder with two types of ink to give the folder a vintage look and when dry lightly went over the top of some areas using Gesso. Then I hand stamped onto the folder using a script stamp in different areas to give it some interest.


Using different digital paper patterns that I had printed out and tore these into different size pieces, then I coloured the edges with Distress ink and also lightly coloured some paper doilies. Then I layered the paper and doilies randomly on top of each other to get the look that I wanted and then glued them on to the front of the folder.

I had printed the image out onto photo paper so I glued that on top of the layers to make the image the focal point. Using a section of cheesecloth I put this behind a crochet flower that I had purchased in the past and stuck that down on the bottom right of the image of the girl


For the flap at the top, I cut a large fabric doily in half and glued one edge onto the back of the folder at the top and this allowed me to drape a part of it over the front of the folder. I then used an applique that I had previously dyed, a small section of cheesecloth and a smaller crochet flower on the top of that and glued those together. Then I glued these on the top left-hand side on to the crochet doily and then added two small tickets again digital images printed out placing them behind the large crochet flower at the bottom right to finish the look of the project
Shabby Chic style decorated paper bag

I made this for a Portrait Challenge, April 2020 on the Gecko Galz Papercrafting Challenge group on Facebook. 

To start I used a small brown paper bag and gave it a coat of Gesso front, back, the handles and just inside the bag at the top and back as I wanted a Shabby Chic look. I used white cardstock and stencilled over that using the colour Cracked Pistachio Distress Oxide in an ink pad


As the stencil is only small and I could not make a continuous pattern for the back of the bag. I used a smaller section of the card that I stencilled using the same colour and design and layered it over the large piece of card, then went around the edges with lace to make it a focal point


The image was added to the front of the bag and a pocket added on the back of the bag.
I then decorated the bag using lace and added a pearl trim and lace to the pocket.

The tags are made using the same stencil design and colour, I then hand stamped rose images onto white card and used for the focal point on the tags.

Finally, I coloured seam binding and flowers using a Peacock feathers Distress Oxide spray and a Distress Oxide ink pad in Cracked Pistachio to match up the colours that I had already used. I then used the flowers and seam binding to decorate the bag


Vintage style faux front envelope

This is made out of a large envelope. The patterned paper and ephemera that I decorated with are digital images and printed out from My Porch Prints on Etsy and the butterfly tags inside are also digital images printed out from Romantic Letters on Etsy


I used a pretty die-cut frame around the image that I coloured with distress ink to make it stand out from the background and make it a focal point and added little fabric roses that I cut from a fabric trim. The front is in two sections and matched up to make it look like one complete piece when closed


Inside left I added a tuck spot., then in the centre I made a fold-down flap that I decorated using a pretty die-cut frame coloured with distress ink to match the frame on the front cover. On the inside centre section, I made a pocket using the pretty paper and added lace. On the right-hand side, I made a fold-out flap and added a pocket and three tags and lace.


The flap in the centre lifts up, I made a pocket on this and added lace. Tags and ephemera are added to decorate. To finish I used a pretty butterfly image and a label to match 
Shabby Chic style file folder journal and Traveler's notebook

I decorated the cover front and back using lace and I made the closure out of a fabric trim and a button The journal can be taken out of the folder as I used a narrow elastic band on the spine of the folio so that the journal slots underneath this and makes the journal more useful so when full it can be taken out easily and replaced


I followed a tutorial on youtube by Re Hatched Designs to make the folio. The majority of the folio is made using digital kits from MedievalMirage on Etsy that I printed out using an inkjet printer onto photo paper, the name of the kits are Baroque Beauties


I used oblong kraft envelopes and decorated inside each one with pattern paper from the same digital kit and added lace around the top edges of each envelope. I attached the envelopes together using double-sided tape to make a concertina so that they fold flat when the journal is shut, these can be used for storage of ephemera or anything that is to be kept safe inside the folio