Thursday 16 December 2021

Holly & Ivy decorated canvas

I made this for the Holly & Ivy Challenge December 2021 on the Gecko Galz Blog

The white canvas is 8 inch by 8 inches in size. To start I used a stencil and white texture paste, laid the stencil on top of the canvas, and using a spatula spread the texture paste over the top then lifted off the stencil and put the canvas aside to dry. When dry the stenciled design gives a raised embossed effect. Next, I gave the canvas a coat of green acrylic paint and dried it off with a craft heat gun.

I then hand-painted over the raised scroll design in different areas on the background with metallic copper acrylic paint.

Having already chosen the image of the girl that is from a digital collage sheet called Cuties at Christmas by the Gecko Galz. I resized the image to fit the canvas and printed it out onto photo-quality matt paper.


The frame around the image is made out of MDF so I painted it with copper metallic paint to match the background, then cut around the image to fit inside the frame.

I adhered them together with glue and then adhered them down in the centre of the canvas. 

The floral spray is hand made by myself and I added that to the right-hand side of the frame then added a holly embellishment to the top left-hand side of the frame, also I coloured clear gem embellishments using a red alcohol marker and added them to the frame

The raised holly embellishments on the four corners of the canvas I had previously made out of paper clay so I painted the leaves with the same green acrylic paint and highlighted them using copper acrylic paint, I also painted the berries with red acrylic paint so that all the decoration on the canvas will match together

I want to enter the Holly & Ivy Challenge for December 2021 on the Gecko Galz Blog 
Gecko Galz

Friday 19 November 2021

 Decorated Book Box

I decorated a wooden book box for the Gecko Galz Magical Dreams Challenge November 2021 on their blog. I started by selecting the image of the lady from the Magical Maidens Digital Collage Sheet that I had purchased some time ago from the Gecko Galz Etsy store.

The image of the lady was resized to fit in the centre on the top of the book box and then I printed the image onto matt photo paper. When dry I used Ranger Distress Glaze and using a sponge gave the image a light coat of the glaze and put it aside to dry 

Next, I gave the box a coat of black gesso that acts as a primer and gives a good base to work from. Using a stencil and white modelling paste I stencilled over the lid of the box with a spatula and when dry it gives a raised embossed effect. I used a larger flat back pearl trim around the centre opening on the top of the lid of the box that will be used to frame the image of the lady.

For around the sides of the box I use a small pearl beaded trim and glued it down, I like to use this when I can as it neatens up the sides and can be painted over if required. Then I gave the whole of the box a coat of Purple Mist Metallic Gilding Polish including all of the pearl trim that I had used. When dry I lightly brushed Gold Treasure Gilding Polish over the lid of the box to bring out the embossed design and also lightly brushed the gilding polish over all of the pearl trim on the top and sides of the box to match.


To help protect the image of the lady I used a sheet of clear acetate and then glued the image into the open section in the centre of the lid from underneath the lid.

To finish I used MDF scrolls and stars that I had made out of air dry clay and gave them all a coat of the same Gold Treasure Gilding Polish and when dry I buffed them up with a cloth. Then scrolls and stars were glued to the top of the box around the image. To finish I added purple gems to all of the MDF scrolls

I would like to enter the Magical Dreams Challenge for November 2021 on the Gecko Galz Blog 

Gecko Galz

Friday 15 October 2021

Decorated Canvas

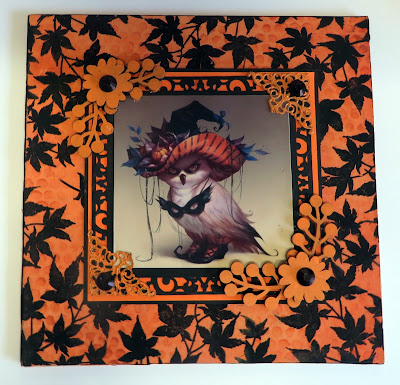
I made a decorated canvas for the October 2021 Image Challenge on the Gecko Galz Blog. 

A free image is displayed on their blog that can be downloaded onto a computer or tablet and printed out as it has to be used as part of a project that is made by each person who wishes to enter the Challenge.

I started with a white blank board canvas that is just under 8 inches square. The background is plain orange that I printed out onto matt photo paper. First I stamped leaves using a black ink pad all over the background, then in sections I used an orange ink pad and a stencil for the dot effect in different areas of the background


A square filigree metal cutting die was used to cut out the black card for behind the image of the owl and then I layered black and orange card stock in different sizes and adhered them all down on the centre of the canvas.

For decoration, I used MDF leaf sprays and flowers and painted those in orange paint to match the project and then adhered those onto two of the corners of the image. I also painted two metal corners with orange paint and adhered those down onto the two remaining corners of the image. The black rhinestones were clear so I coloured them with a black Sharpie pen, these were used for the two metal corners and the centre of the flowers

          I want to enter the October 2021 Image Challenge

                                                   Gecko Galz


Tuesday 21 September 2021

Fabric and lace wall hanging

I made the fabric and lace wall hanging for the Gecko Galz Image Challenge  September 2021 on their Blog.


To start I used Art Canvas Inkjet Art Paper to print the image of the ladies and also the background design as well. Both the image of the ladies and the background design are from the Gecko Galz.

I cut to size a piece of batting and then adhered to the canvas background using Beacon 3 in 1 glue. I also adhered batting behind the image of the ladies. For the back of the wall hanging, I used an ivory coloured lace fabric and around the edges a cream colour lace trim.

To decorate around the image of the ladies I added 3 different narrow laces and then went around the image again using an ivory colour flat back pearl trim.

The background design has pretty purple flowers on it and they matched the image nicely. Along both sides of the wall hanging, I used a narrow gathered lace in cream and then adhered the pearl trim on top of that. At the top of the wall hanging, I decorated using 2 different laces and added small flower embellishments on top. 

For the bottom of the wall hanging, I used a pretty wide scalloped lace in ivory and then a lilac colour flower lace trim, I also added ivory flat back pearls. At the top two corners of the image, I used the same purple flower embellishments as I had used at the top of the wall hanging

I want to enter the September 2021 Image Challenge on the Gecko Galz Blog

Gecko Galz


Saturday 11 September 2021

Decorated Note Book

To start I used a shop-bought plain portrait style notebook. I made a cover front and back using a brown kraft card and adhered it onto the original cover to add strength. Using a sheet of tea-dyed paper I lightly coloured over a scroll design of stencil and adhered that onto the front cover, I also used a piece of lace fabric in a cream colour and adhered that on top of the front cover. 


Using a sheet of white paper cut to size I randomly stamped a script design onto the paper and when dry I lightly coloured the paper with Distress Oxide ink so it will match the project. I used a pretty die cut that I again coloured with a Distress Oxide ink pad and adhered that down in the centre of the stamped paper. 

The image of the ballerina is from a digital collage sheet that I had purchased from the Gecko Galz Etsy store that I printed onto white photo paper, then I mounted that onto brown kraft card stock and then adhered them down on top of the die-cut. An ivory colour narrow crochet trim I placed around the edges of the layer of paper and added a flat back pearl trim on the edges of those


At the top and bottom of the front cover, I added a wide crochet trim and I also added a pearl effect flower trim at the top. The flowers did not match the project so I lightly coloured them with Distress Oxides ink pads and arranged the flowers to the bottom right-hand corner of the image. I added a gold-coloured corner peel-off on the top left-hand corner of the image. To balance the look a small pearl was added to the top right and bottom left of the image

I want to enter the Gecko Galz September Challenge 2021

"Ballerina Girls"

Gecko Galz


Wednesday 21 July 2021

Vintage style card

The blue pattern paper is from the La Isla Bonita ATC set and the image of the lady is from the Beauties on the Beach Collage set both from the Gecko Galz.

The card is 7 inches by 5 inches in size. For the red card, I used a floral stamp design and a red ink pad, and also clear embossing powder that I heat set to give a raised effect. The front of the card is layered using the red and blue card in different sizes and I also re-sized the image to fit on the front of the card 


The parasol I hand-stamped onto the same blue patterned card and cut it out, then I trimmed it with white lace and pearl string. I added a thin wooden stick to make it look realistic and adhered the parasol onto the card base. 

The sunglasses are a metal cutting die that I used to cut out the yellow frame and I coloured the inside of the frame with an alcohol pen. The word Summer I cut out and adhered it down underneath the image of the lady. I added a handmade paper clay shell that I had previously made and coloured and I adhered that to the bottom right of the card. To finish I added 3 blue flat back embellishments to the top right of the image to give a finished look


Saturday 17 April 2021

Vintage style tag

I made the tag for the "Blooming Beauties" monthly Challenge for April 2021 on the Gecko Galz Blog. 

It is always fun to join the Challenges on their Blog and on their Facebook group.

The image of the lady is from "Pretty Portraits 1" by the Gecko Galz and was printed onto photo paper and sized to fit the tag. I coated the image with Ranger Distress Glaze to bring out the vibrancy of the image and to protect it.


The size of the tag is 8 inches by 41/2 inches and made out of strong white cardstock.

I used script paper for the background to decorate and then a rectangle of leaf patterned paper that was each adhered to the tag, one on top of the other. Then I adhered the image onto the tag. Lace was used to decorate the base of the image. I then used a die-cut of a pretty flower in black and white that I painted with Ranger Distress Oxide Vintage Photo mixed with water to match the tag.

At the top, I used another die-cut and adhered the word "Memories" in the centre of that. I also lightly painted it to tone it down so it will also match the tag.

Along the base of the tag, I used a lace trim to decorate. Then I added a large flat back pearl embellishment to the centre of the flower and small flat backed pearl embellishments in three of the corners around the image

I want to enter the "Blooming Beauties" April 2021 Challenge on the Gecko Galz Blog 

https://geckogalzscrapbooking.blogspot.com/2021/04/gecko-galz-monthly-challengeblooming.html


Sunday 21 March 2021

 Spring theme Plaque and stand


I had a lot of fun creating this little garden scene. I started with a plain arch shape MDF frame and backing. First I painted the front of the frame with blue acrylic paint, when dry I gave the frame a coat of crackle medium, dried it off with a heat gun and then coated the frame with white acrylic paint that cracked while drying. I used a baseboard frame from Tim Holtz and I used the back of it. Using a stencil and the same blue acrylic paint that I used for the frame I gave that a light coat of paint. The beautiful image of the birds is from the Gecko Galz


When everything was dry I glued the frame over the photo of the bird image and glued it onto the back of the main arch shape. The fence is made out of wooden plant sticks that I cut to size. I painted these with white acrylic paint. I wanted the frame to stand on a table so I used an oblong shape of MDF and glued the whole frame on top of that then I adhered the fence to the frame at the bottom The white shelf at the base of the fence I layered wooden plant sticks to look like a shelf and painted those white. 

To make the frame look neat around the edges I adhered flat back pearl trim. Around the base, I added more plant sticks painted white then adhered pearl trim The watering can, plant pots and the little spade and trowel I made out of paper clay, then I painted them blue to match the rest of the project. When dry I adhered them onto the white shelf. To make the garden scene look more realistic I used moss and adhered that down around the base. To finish I used a metal embellishment that I also painted blue and added a flat back pearl to the centre of the plaque at the top


I want to enter A Walk with Nature March 2021 Challenge

 on the Gecko Galz Blog

https://geckogalzscrapbooking.blogspot.com/2021/03/gecko-galz-march-challenge-walk-with.html


Monday 18 January 2021

 Oriental canvas

To start I cut red cardstock to 8 inches in size to fit a square board back canvas. I wanted a layered look to the canvas by varying different sizes of coloured cardstock. 

On the first red layer of cardstock, I hand-stamped a floral design onto the card using a Versafine Clair ink pad in black. Then for the second layer using a white piece of square cardstock I stamped the same design using the same black ink pad and coloured the flowers with an Inktense pencil in red and the stems and leaves with an Inktense pencil in brown. I then painted over each colour using a water brush to set the colours. I stamped on the black cardstock using the same floral design and used a clear Versamark clear ink pad and clear embossing powder so that they would show up on a dark background


For the last layer of red cardstock I again hand stamped the floral design using a black ink pad. I then added a layer of gold-coloured card around the image matted onto black card to make the image stand out and be the main focal point of the canvas.

Then I arranged each layer of card stock and adhered them on top of each other and then I adhered them onto the canvas board and then went around all four sides of the canvas with gold gilding wax.

I always like to start decorating a project using embellishments to match the main focal image so that they add decoration and interest.

As I did not have the colours to match I made my own coloured embellishments. The flowers and scrolls are made from an MDF a board like material. I coloured those with gold gilding wax and I did the same for the metal corners that I arranged on the canvas. The red imitation gems were coloured using a red alcohol pen

Image from Asian Dreams Digital Collage Set Gecko Galz on Etsy

I want to join 

FAR EAST BEAUTY Challenge on The Gecko Galz Blog January 2021

Gecko Galz