Thursday, 16 January 2020

Shabby Chic style pocket and tags

I made the pocket and tags for the Blushing Roses Challenge January 2020 on the Gecko Galz Papercrafting Challenge Group on Facebook.

The pocket I created using pink spotted double sided paper. I decorated the front with cream lace and around the edges of the pocket and then I added pearl trim. To finish I used a lace butterfly on the front, pink bows and a pearl on either side of the front of the pocket.


The tags I distressed around the edges and I printed out the digital images from the  Lovely Little Valentines 2 set that I purchased from the Gecko Galz Etsy store.


I cut out and mounted each image onto plain pink card and distressed around the edges. I added lace to the tags and little pink lace flowers with pearl centres and pink bows as decoration. Finally I added pink seam binding to the top of each tag


Wednesday, 1 January 2020

Christmas Vintage Style decorated metal tin and matching small concertina book. 

The size of the tin is 31/2 inches by 21/2 inches. I made these for the December Challenge called Sparkle on the Gecko Galz Papercrafting Challenge Facebook Group.


The images and pattern paper that I used are from the Gecko Galz as follows

Christmas Cuties
Very Vintage Christmas
Altered Christmas 
Grandmothers House

I used a silver metal tin and papered the inside and the outside of the tin. I used red trim around the inside and outside of the base of the tin, and also the outside of the lid. Then I glued an image on the inside base of the tin and also on the lid


The little book was made to fit inside the tin. Using a strip of pattern paper I scored it every 2 inches to make a concertina fold and then edged this with an ink pad using a sponge. I fussy cut the images and sponged each one around the edges. The images were glued onto the paper. I also made pockets for the inside to put little tags inside the book. I edged the pockets with lace and added little red bows. The Father Christmas image was glued to the front of the book and I added a green trim to make it look finished. I glittered parts of the images inside the book and the image on the front of the book and also on top of the lid


Thursday, 16 August 2018

Vintage style ATC's. I made two sets of three ATC's. The white card backgrounds are coloured using Dylusion sprays and Distress Oxide ink pads and then hand stamped using a variety of stamps the flowers and leaves at the top of three of the ATC's


I coloured using the Spectrum Noir alcohol markers. I then decorated the ATC's using the Tim Holtz paper dolls and drew around them with a black waterproof pen and then I added the Tim Holtz word stickers. Finally I sealed the ATC's using the Ranger Multi Medium Matte to seal them

Thursday, 16 February 2017

Vintage style Loaded envelope

I made the Loaded envelope myself by following a tutorial on you tube. The base of the envelope is made using Kraft card. The pretty rose paper that I used for the background is from a digital patterned paper set that I purchased on Etsy. I printed out the rose patterned paper image and covered the Loaded envelope front, back and inside I also made a pocket for the bottom front part of the envelope. I cut a slit down the centre on the front at the top and rolled each edge out so it gave a pretty look then I decorated the envelope using lace and pearl embellishments. For the top section I used pink and cream flowers from Wild Orchid Crafts. The large flower at the bottom is metal and I layered that and used a pale pink fabric flower and an embellishment in the centre. The tags are also made out of Kraft card and again the images are digital purchased from Etsy. For the front of the tag I made a ribbon bow and I also added an embellishment to the centre of that. I hand made the paper rosettes and added a digital image to one front and back and then for the other rosette I used a fabric flower and and embellishment to decorate the front and back. I mounted each rosette onto a paper straw and slotted those into the top of the Loaded envelope together with the tags


Vintage style tag


I used a large mdf tag and padded the front of it. To match the Loaded envelope I printed out two different designs from the digital paper pack that I had purchased on Etsy onto printable canvas and then I adhered the canvas over the padding and adhered it to the tag. The pocket is also made out of the printable canvas and I used a piece of felt on the inside back of it to strengthen as I had made the tag to use the top part as a pin cushion I wanted the pocket to hold scissors and other sewing accessories. I added pretty lace to the top of the pocket and also the bottom of the tag and added a fabric flower on top of the pocket and a pretty embellishment and also at to the top of the tag. I used two strips of pearl string to go around the tag and to the sides to give the tag that finished look


I also included a smaller pretty tag with a lady image on the front to make a set that all matches

Tuesday, 7 February 2017

A Shabby Chic style Fabric and Lace mitten


I found a free template on the internet and printed it out. Then cutting around the shape of the template I cut out two pieces of cream felt. As I am not a sewer I glued the two pieces of the mitten shape together around the edges using fabric glue leaving the top part open so the mitten can be used as a pocket. Using a wide white lace I laid that over the front and the back of the mitten and glued it down using fabric glue. To edge the mitten I used two different widths of cream lace and pearl trim around the edges on the front and the back of the mitten. The image I purchased from Etsy and printed that out onto printable inkjet canvas.

I cut out the image and glued that down to the mitten then I used a crocheted frame and some pearl trim to decorate around the image. I cut a plastic snowflake in half and slotted those in either side of the frame to add decoration tucking each piece underneath the crochet frame. Around the top part of the cuff I used gathered net lace and edged that using lace and braid in colours to match the mitten. I added a handmade flower to the top right using gathered lace and sections of eyelash wool then added two separate gold coloured appliques and tucked those in either side of the hand made flower, I also added an embellishment to the centre. For the smaller flower next to the image I used two fabric flowers one white and one in gold and added an embellishment to the centre. Finally I added a cream tassel and sections of eyelash wool and attached the tassel to the top section of the mitento finish off the whole look

Sunday, 14 August 2016

Marie Antoinette fabric and lace pocket book


I made this Marie Antoinette fabric and lace pocket book as I really like the image. I chose the image first and printed that out onto printable inkjet canvas and then used the colours in the picture to decorate the book. Around the image I used pretty guipure lace and for the main part of the front cover I cut up some fabric appliques and arranged them on the cover of the book and then glued them down, The large pink flower I made and used a pretty embellishment in the centre of that, I also used smaller flowers to decorate around the image. For the bottom front of the book I also used some pretty dangle lace


For the inside pages I used pretty dangle lace at the bottom edge and wide lace to make two pockets and I decorated around the edges of the pages using lace. To decorate the pockets I used two lace butterflies and added small pink ribbon roses in the centre of each butterfly. To decorate the pages I used pretty pink fabric flowers, pink bows and embellishments. Finally I added ribbon to the edge of the front and back covers to use as a closure


Sunday, 15 March 2015

Fabric covered notebook

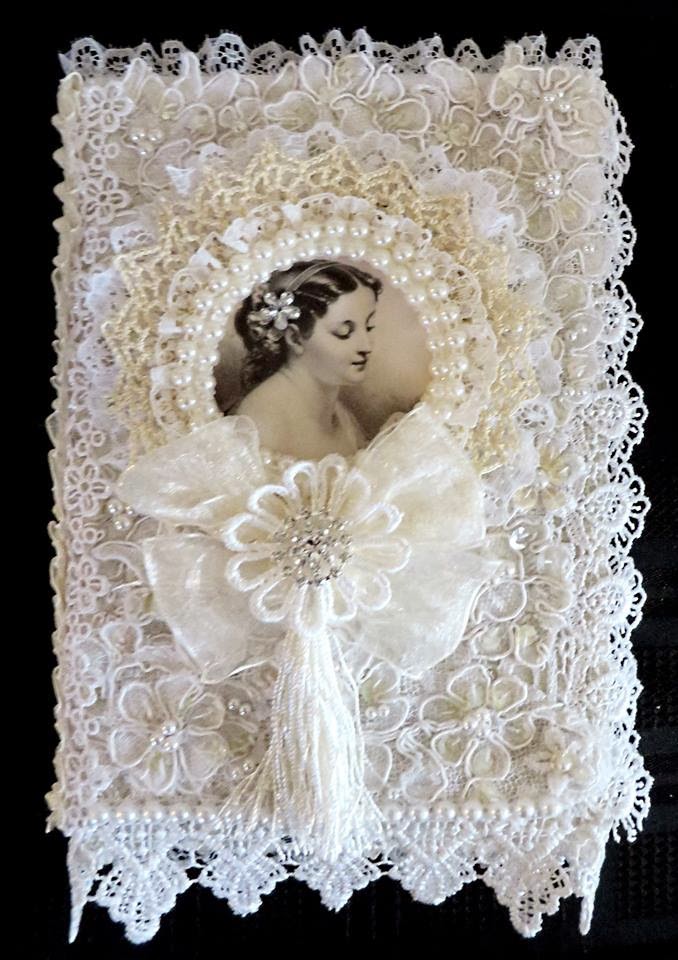
I made a fabric covered notebook as a gift for a friend of mine. The notebook is A5 in size. I covered the notebook using cream felt and then I used a white lace fabric to cover the felt. I cut the flowers out of wedding appliques and arranged them on the lace fabric and then I glued them down onto the background using Fabri Tac glue. As there are sequins on the appliques it gives a sparkling effect and looks very pretty


I bought the image of the lady from Etsy and printed it out onto Inkjet canvas then I cut the inside section out of a cream coloured doily and used that to frame the image. I then glued two layers of white gathered lace around the edge of the doily and then adhered the whole section down onto the background. On the spine of the book I added some pretty white guipure lace and a cream coloured trim. Underneath the image I made a bow using a pale cream organza ribbon and a white flower applique and I added a pretty rhinestone embellishment, then I added a cream tassel. Using guipure lace I trimmed around the three edges of the notebook on the front and back and then I used pearl trim to give the cover a finished look